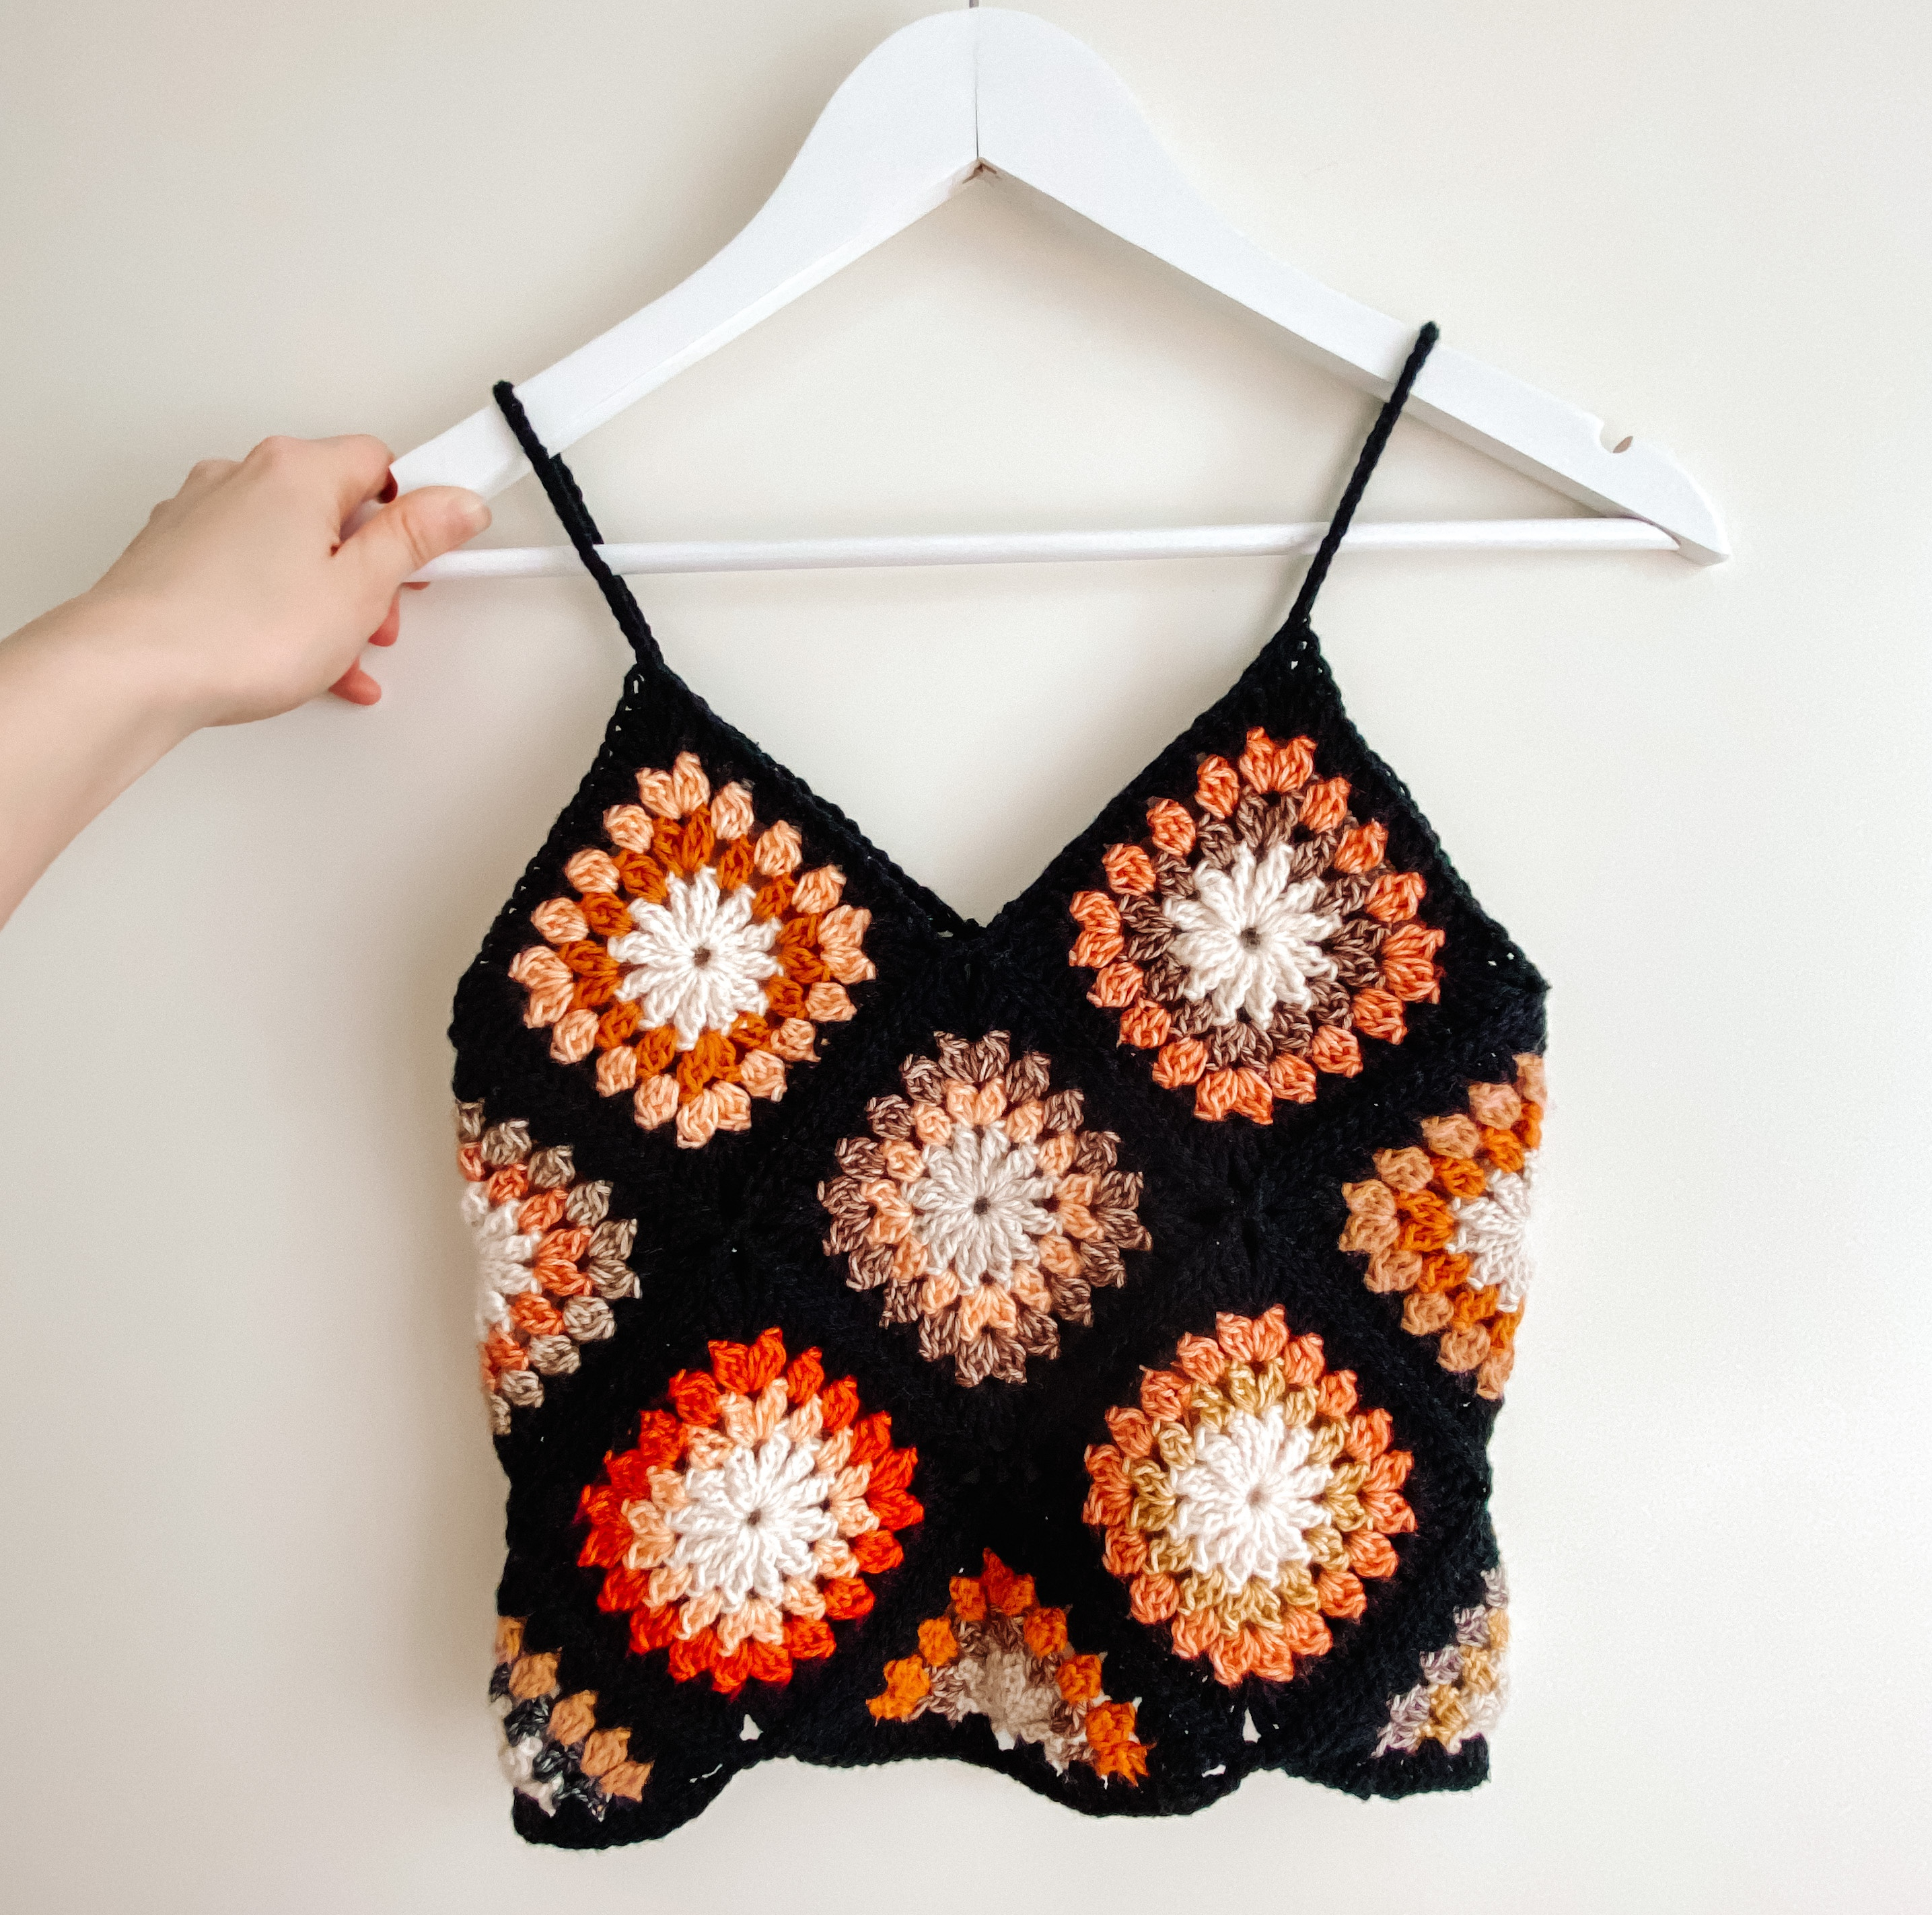
Wow! I shared a pic of my newest creation – granny square top – on Instagram and I’ve never had a welcome like that. Summer flower granny square top is a crochet top made of cute flower granny squares! Since the pic of the crochet top got so many shares and saves there, I decided to share the crochet top pattern with you! 🙂 And yes, the pattern is FREE!
Hey you crochet or knitting blogger! Want more traffic to your blog or to make passive income with crocheting? Check out my blog posts about how to increase your blog’s Google rankings and how to make money crocheting (online)!
In love with granny squares? Check out my brand new and free granny square crochet balaclava pattern!

Figure 1. Summer Flower Top – granny square crochet top.
(*This post contains some affiliate links and I may receive commissions for purchases made through links in this post at no extra cost to you. Affiliate links are marked as *.)


Content
Introduction
Materials and Specifications
Flower Granny Square Pattern
Flower Granny Triangle Pattern
Joining Granny Squares and Triangles
Straps and Finalizing Edges
Introduction
What makes the crochet top so special is the color set! The floral part of the square is made of Scheepjes Stone Washed and River Washed yarns*. I bought Scheepjes Colour Pack Stone Washed – River Washed yarn pack that contains 58 little cute yarn balls of different colors (one of my best purchases when it comes to yarn!). The black parts of the top are crocheted using Novita Cotton Soft yarn. You can also use any other DK or sport weight yarns, such as Lion Brand 24/7 Cotton DK* or Drops Safran*.
I have included crochet instructions for two sizes – XS/S or S/M. The crochet top shown in the pic above is size XS/S. The larger size is crocheted by adding additional round for the granny square so the amount of squares remain the same in both sizes. The smaller size is quite flat from the chest so there might be no room for bras. Since the top is, in general, quite small you can get a bigger size by using thicker yarn and a crochet hook according to the yarn weight.

Materials and Specifications
- Tools: Crochet hook 3.0 mm* or 3.5 mm.
- Yarns:
- Scheepjes Stone Washed – River Washed yarn pack* (also from WoolBox UK* and WoolBox USA*)
- Novita Cotton Soft in color “noki” (099) 2 balls (XS/S), 2-3 balls (S/M) or other black DK/sport-weight yarns such as Lion Brand 24/7 Cotton DK* or Drops Safran*.
- Instead of Scheepjes yarn pack you can also purchase Scheepjes Stone Washed yarn balls* or Scheepjes River Washed yarn balls* separately.
- US terminology.
- The finished crochet top in size XS-S measures approx. 71 cm around waist when not stretched and in size S-M it measures approx. 80 cm when not stretched. The side length of a smaller square measures 11,5 cm and the diagonal measures 15 cm.
The granny square top is made of colorful squares and triangles. The Figure 2 shows three tables. The table on the left shows the yarn color names and codes and which alphabets represent each colors. The tables on the right show the color order in the squares and in the triangles. The first letter represents the color of the inner circle or half circle and the second letter the color of the next round and so on. The numbers 1-15 in front of the color orders represent the numbers of each square/triangle. This number information is needed so that each square and triangle are in the correct place when joining them together. The correct order is presented in the end of the pattern (Figure 16).

Figure 2. Yarn colors and corresponding alphabets and color order in the squares and triangles.
The crochet top pattern was not tested with other crocheters so be aware that there might be mistakes. Please, feel free to contact me anytime if you face any problems with the pattern. 🙂
*New crochet top pattern alert*: Lively Lace Crochet Top
Remember to check my brand new crochet top pattern on Ravelry and Etsy!
Lively lace top will definitely look beautiful on you!
Note: this is a pdf pattern, not a physical crochet top product to buy. The link leads to my Ravelry store.


Flower Granny Square Pattern

Figure 3. The square crochet pattern (a bit twisted one though :)).

Figure 4. The symbol chart for the granny square and triangle.
Start the flower granny square doing a magic loop with the first color (XYZN). XYZN represents the color order of the square so that X represents the yarn color of the first round, Y represents the second round’s color and so on. N represents black yarn that finishes the square. The bolded letter in XYZN indicates the yarn color that is used in the following round.
Round 1: Chain 4 into the loop (this counts as the 1st treble (tr) crochet stitch). Insert a treble crochet and pull the yarn through both loops on your hook. Close the cluster with a chain stitch and chain one (1). *Crochet a 2-tr-cluster: insert a tr into the loop but do not pull the yarn through the last two loops on your hook. Instead, insert the second tr and pull the yarn through until you have three (3) loops on your hook. Pull the yarn through all of them and close the cluster with a chain. Chain 1.* Repeat * 10 more times. Pull the tail end of the yarn and close the round with a slip stitch (sl st) to the top of the first cluster. You now have 12 clusters in a magic loop.

Figure 5. The round 1 of the granny square.
Change the color (XYZN).
Round 2. Crochet a slip stitch to the chain between the first and the second tr-cluster. Chain 3 (this counts as the 1st double (dc) crochet stitch). Insert a dc and pull the yarn through both loops on your hook. Close the cluster with a chain stitch and chain one (1). *Crochet a 2-dc-cluster: insert a dc to the chain between the second and the third tr-cluster but do not pull the yarn through both loops on your hook. Instead, insert the second dc and pull the yarn through until you have three (3) loops on your hook. Pull the yarn through all of them and close the cluster with a chain. Chain 1. Now, insert two 2-dc-clusters to the chain between the third and the fourth tr-cluster (close the first 2-dc-cluster with a chain and chain 1. Insert the second 2-dc-cluster and close it with a chain and chain 1.)* Repeat * 3 more times. Close the round with a sl st to the top of the first cluster.

Figure 6. The round 2 of the granny square.
Change the color (XYZN).
Round 3. Crochet a slip stitch to the chain between the first and the second dc-cluster. Chain 3 (this counts as the first dc). Insert a dc but do not pull the yarn through the last two loops. Instead, insert the third dc and pull the yarn through until you have three (3) loops on your hook. Pull the yarn through all of them and close the cluster with a chain. Chain 1. *Crochet a 3-dc-cluster: insert a dc to the chain between the second and the third dc-cluster but do not pull the yarn through both loops on your hook. Instead, insert the second dc and pull the yarn through until you have three (3) loops on your hook. Insert the third dc and pull the yarn through until you have four (4) loops on your hook. Pull the yarn through all of them and close the cluster with a chain. Chain 1. Now, insert two 3-dc-clusters to the chain between the two 2-dc clusters (close the first 3-dc-cluster with a chain and chain 1. Insert the second 3-dc-cluster and close it with a chain and chain 1.) Insert one 3-dc-cluster to the next chain between 2-dc-clusters as described earlier. Insert another 3-dc-cluster to the next chain.* Repeat * 3 more times (except in the last repetition time, do not follow the last sentence of *). Close the round with a sl st to the top of the first cluster.

Figure 7. The round 3 of the granny square.
Change the color to black (XYZN).
Round 4. Crochet a slip stitch to the chain between the first and the second 3-dc-cluster. Insert the first 3-dc-shell: chain 3 (this counts as the first dc) and insert two dcs to that same chain between the first and the second 3-dc-cluster. Move on forward to the chain between the second and the third 3-dc-cluster and insert a 3-dc-shell (no chaining between the shells). *Now after a total of two 3-dc-shells, insert two 3-tr-shells to the chain between the two 3-dc-clusters and chain 1 between these 3-tr-shells. Insert a total of four (4) 3-dc-shells to each chain between 3-dc-clusters of the round 3.* Repeat * 3 more times. Insert two 3-tr-shells the the last corner as described earlier and then insert 3-dc-shells to each chain before the end of the round. Close the round with a sl st to the top of the chained dc.

Figure 8. The round 4 of the granny square.
For size XS/S the flower granny square is now finished. For larger size (S/M) follow the round 5: Use the same color again (XYZNN).
FOR SIZE S/M: Round 5. Repeat the round 4 so that you insert 3-dc-shells to every space between previous round’s 3-dc-shells and two 3-tr-shells to the chain between previous round’s 3-tr-shells.

Figure 9. The round 5 of the granny square (for size S/M).
Crochet a total of 12 flower granny squares according to the table in the Figure 2.
Flower Granny Triangle Pattern

Figure 10. The triangle crochet pattern.
Crochet three (3) flower granny triangles. You can find the color order for the triangles in the Figure 2. Start the triangle doing a magic loop with the first color (XYZN).
Triangle round 1: Chain 4 into the loop (this counts as the 1st treble (tr) crochet stitch). Insert a treble crochet and pull the yarn through both loops on your hook. Close the cluster with a chain stitch and chain one (1). *Crochet a 2-tr-cluster: insert a tr into the loop but do not pull the yarn through the last two loops on your hook. Instead, insert the second tr and pull the yarn through until you have three (3) loops on your hook. Pull the yarn through all of them and close the cluster with a chain. Chain 1.* Repeat * 4 more times. Pull the tail end of the yarn so that the clusters form a half circle. You now have 6 clusters in a magic loop.

Figure 11. The round 1 of the triangle.
Change the color (XYZN).
Triangle round 2. Chain 3 (this counts as the 1st double (dc) crochet stitch) and turn the work around. Insert a dc to the top of previous round’s 2-tr-cluster right next to the 3 chains and pull the yarn through both loops on your hook. Close the cluster with a chain stitch and chain one (1). *Crochet a 2-dc-cluster: insert a dc to the chain between the first and the second 2-tr-cluster but do not pull the yarn through both loops on your hook. Instead, insert the second dc and pull the yarn through until you have three (3) loops on your hook. Pull the yarn through all of them and close the cluster with a chain. Chain 1.* Repeat * one more time. Now, insert two 2-dc-clusters to the chain between the third and the fourth 2-tr-cluster (close the first 2-dc-cluster with a chain and chain 1. After the second 2-dc-cluster, close it with a chain and chain 1). Then repeat * 3 more times but do the last 2-dc-cluster to the top of previous round’s 2-tr-cluster.

Figure 12. The round 2 of the triangle.
Change the color (XYZN).
Triangle round 3. Chain 3 (this counts as the 1st double (dc) crochet stitch) and turn the work around. Insert a dc to the top of previous round’s 2-dc-cluster right next to the 3 chains but do not pull the yarn through the last two loops. Instead, insert the third dc to the same loop as the second dc and pull the yarn through until you have three (3) loops on your hook. Pull the yarn through all of them and close the cluster with a chain. Chain 1. *Crochet a 3-dc-cluster: insert a dc to the chain between the first and the second 2-dc-cluster but do not pull the yarn through both loops on your hook. Instead, insert the second dc and pull the yarn through until you have three (3) loops on your hook. Insert the third dc and pull the yarn through until you have four (4) loops on your hook. Pull the yarn through all of them and close the cluster with a chain. Chain 1.* Repeat * two more times. Now, insert two 3-dc-clusters to the chain between the two 2-dc clusters (close the first 3-dc-cluster with a chain and chain 1. Insert the second 3-dc-cluster and close it with a chain and chain 1.) Then repeat * 4 more times but do the last 3-dc-cluster to the top of previous round’s 2-dc-cluster.

Figure 13. The round 3 of the triangle.
Change the color to black (XYZN).
Triangle round 4. Chain 4 and this time, do not turn the work around. From now on, you will work around the triangle. The 4 chains belong to the last cluster of this round. Base side: Now, you will work the base side (the longest side) of the triangle. Insert three (3) dc stitches to the last dc of the triangle round 3. These three dcs form a 3-dc-shell. Move on forward to the next space (the 3 chains of the triangle round 2) and insert a 3-dc-shell (no chaining between). Move on to the last tr of the triangle round 1 and insert a 3-dc-shell. Now after a total of three 3-dc-shells, chain 1 and insert another three 3-dc-shells to the corresponding spaces as the first three 3-dc-shells. Next comes the right corner: insert two 3-tr-shells to the top of the first 3-dc-cluster of the previous round (round 3) and chain 1 between the 3-tr-shells. Next comes the right side: insert a total of four (4) 3-dc-shells to each chain between 3-dc-clusters of triangle round 3. Next comes the top corner: insert two 3-tr-shells (chain 1 between the 3-tr-shells) to the chain between two 3-dc-clusters of the triangle round 3. Next comes the left side: insert a total of four (4) 3-dc-shells to each chain between 3-dc-clusters of triangle round 3. Next comes the left corner: insert two 3-tr-shells to the top of the last 3-dc-cluster of the previous round (round 3) and chain 1 between the 3-tr-shells, NOTE: in the second 3-tr-cluster, do not insert the third tr because you have already chained one tr in the beginning of this round. Close the round with a sl st to the top of this chained tr.

Figure 14. The round 4 of the triangle.
For size XS/S the flower granny triangle is now finished. For larger size (S/M) follow the round 5: Use the same color again (XYZNN).
FOR SIZE S/M: Triangle round 5. Repeat the round 4 so that you insert 3-dc-shells to every space between previous round’s 3-dc-shells and that you insert two 3-tr-shells to the chain between previous round’s 3-tr-shells.

Figure 15. The round 5 of the triangle.
Joining Granny Squares and Triangles
Next step is to join squares and triangles together. I used the flat slip stitch joining method and I used the black yarn for joining. Check a great photo tutorial or a video tutorial for the flat slip stitch joining method.
The Figure 16 below shows how to assemble the squares and triangles. Note that there are only three triangles, the back hem of the top will be left “open” as you can see in the Figure 16.

Figure 16. Assembly of the squares and triangles from front and back of the top.
Join the granny squares and triangles so that you crochet two sides together from bottom to top and then the next two parallel sides together and so on. Then join those sides together that are perpendicularly to the first sides.
Start joining the granny squares and triangles together first from the chains of 3-tr-shells and then move on to the loops. Crochet flat slip stitches until you reach the 3-tr-shell chains again and crochet one flat slip stitch to those chains too. Then move on straight to the next squares without chaining between. When you have joined all squares parallelry, start joining the other sides. When you reach the perpendicular flat slip stitch seam, chain 1 and cross over it. Start joining the next squares together first from the chains of 3-tr-shells and then move on to the loops.
Straps and Finalizing Edges
After you have joined all the granny squares and triangles together the next step is to crochet the shoulder straps. Start from the top corner of the square from the back side of the top and chain 40 (you can also test what length is best for you). Join the strap with a slip stitch to the corresponding top corner of the square from the front side and cut the yarn. Do the same thing to the other shoulder strap but this time do not cut the yarn. Now, you finalize the edges and the straps by crocheting slip stitches first along the front neckline, then along the first strap you chained, then along the back neckline and finally along the second strap. Cut the yarn and close the round with additional slip stitch. Finalize them hem edge with slip stitches. Weave in the ends.
There you have a beautiful crocheted summer flower top! Please feel free to ask or give comments and corrections about the crochet top pattern.
Use #summerflowertop so I can see your creations. 🙂
Check out other trendy crochet patterns and tips!
- Crochet Beach Cover Up Pattern | Positano Crochet Cover Up Pattern
- Crochet Lace Top Pattern | Crochet Lace Tank Top Pattern
- Balaclava ohje | Isoäidinneliö kypärähuppu
- Crochet Balaclava Free Pattern | Cool Granny Square Balaclava
- How to Make Money Crocheting (Online)?

44 responses to “Summer Flower Top | Granny Square Top | Free Crochet Top Pattern”
[…] The Summer Flower Top from Swool Nordic Design […]
At last have found instructions on how to join this lush top together! I bought it on kindle then bought it in hard copy yet still no instructions on joining together? Now I find the same pattern for free with much needed finalising instructions and a lot more… Thank you so much😘😘
Thank you for your comment! 🤗 I am happy my pattern here helped you! I am aware of the pattern on kindle. That writer has stolen my pattern. 😞 This one here on my blog is the original Summer Flower Top pattern. I will report this on Kindle! Thank you for telling this to me! ❤️
Br, Heini
What number of stitches do you use for your magic ring? I am start this project now but i have started with 4 and 6 but just doesnt seem big enough.
Magic ring doesn’t include stitches and the trebles are crocheted directly to the ring. Other way to create the ring is to chain about 8-10 and close the chain ring with a slip stitch. Then you start with the trebles. I hope this helped! 🙂
Do you have a video tutorial on how to assemble this?
Hi! No I don’t, unfortunately 🙁 I hope the video in the assembly part of the pattern still helps 🙂
hello 😀 thank you so much by the way for this beautiful pattern, I’ve never made a granny square before but found your instructions super easy as they’ve turned out great…
my question is just about the sizing really, i’ve made it in size S-M and doubled the last row of DC shells so that i have 5 rows in total. I’ve just measured one though and its only 15cm wide… i used sheepjes stonewash yarn the same as you but it will only be 60cm wide when i sew it together surely? not the 80cm it says at the top of the page
my tension isnt overly taught, so do you have any ideas why this may be and what i can do to make sure it will fit? My bust measurement is 85cm by the way
thank you and all the best!
Beth 🙂
Thank you so much for your comment! I am happy that instructions were easy to follow, I wanted to make them as clear as possible! 🙂
The size is indeed very small! That was my concern when I was writing this pattern, as the top appeared very tight.
When I measured the xs-s top around, It measured 70-71 cm when not stretched so that 60 cm measurement would be very small even for size xs-s 😮 I haven’t myself crocheted the larger top so in this case the measurements are calculated based on the diagonal of the square. Did you measure the diagonal or the side length? Since the squares are assembled as ”rhombuses”, the girth of the top is measured 4*length of diagonal + seaming. Otherwise it may be about the tension.
I really appreciate comments about sizing because then I can improve the pattern details! So thank you for that. 🙂
[…] Photo & Crochet Pattern by Heini Pääsky. Available on Swool Nordic Design […]
[…] You can get the pattern for free here. […]
Hi, I’d like to make this beautiful top but I’m not sure which category of yarn I should use. What do you recommend?
Hi! The black yarn in this top is DK weight (3) and colorful yarns are sport weight (2) yarns! 🙂
[…] * Il top nero con le mattonelle granny multicolore puoi copiarlo cliccando qui. […]
You could have told size of the square to reach that size of the top.. I just joined the squares, and size of the top is appr. 5 years. Or maybe I just didn’t find it.
Hello, 🙂 I see maybe the issue with the pattern that may be causing the sizing problems. You wrote that the pattern is in UK terminology, but looking at your stitches I can see they are actually US stitches. This could be the reason why people are having sizing issues, since they are crocheting in smaller stitches (ex: UK treble crochet is US double crochet). So the point is that they need to be actually crocheting in US stitches. Your first picture (fig.5) of round 1 of the granny square is in US treble crochets. This could be the problem.
Maybe it was meant to say that it’s written in English but the crochet terms are definitely US. Still VERY small if using the suggested 3mm crochet hook and 5 row granny. OK for a child.
Hi, I was wondering what size your finished squares are for this top.
So how many inches are the squares for a size small? And how big for medium? So I can make a large lol
[…] Summer Flower Top Crochet Pattern […]
[…] pairing the bralette with high waisted shorts or skirt. Don’t forget to check my other cute crochet summer top pattern! […]
[…] Find this free pattern on swoolnordicdesign.com. […]
[…] Get the Summer Flower Granny Square Top Pattern […]
[…] Granny Square Top […]
[…] Get Pattern […]
[…] swoolnordicdesign […]
[…] Summer Flower Top | Granny Square Top Crochet Pattern […]
[…] Granny Square Top […]
[…] Get the Pattern […]
Hi! So for the DC/TR clusters, im used to ending it pulling through the three loops at the top. You then say to “finish off the cluster with a ch… then ch again”. Does that mean it’s technically two chains before starting the next cluster?
Hi Adam! Thank you for your message! That’s correct, so basically two chains before other dc/tr 🙂
[…] Klikkaa isoäidinneliötopin ilmaiseen virkkausohjeeseen! […]
[…] Suosituin ohjeeni: virkattu toppi -virkkausohje! […]
Hi there, Thanks for the pattern. Can you tell me the size of each individual granny square to make a size S (adult)?
[…] Classic Granny Square Tank Top […]
Beautiful pattern, but runs extremely small, even when using the correct yarn weight and hook size. I made size M and it came out more like an XS. I ended up adding a SC row around each square with a chain in the corner. This fixed the size issue but left it a little loose at the bottom so I just made a chain that I can thread through the empty triangle area in the back to tighten it a bit. This was fine for me as I’ve been crocheting for a while but might not be the best for beginners.
[…] Continue Reading → […]
Could you advise how I would be able to make this in an extra large?
[…] Granny square top: Summer Flower Top […]
[…] Find this free pattern on swoolnordicdesign.com. […]
[…] Granny Square Top Crochet PatternCrochet Bralette PatternBreton Tank Top Crochet PatternCrochet Hair Scrunchie Pattern […]
[…] The free pattern is on the Swool nordic design blog: Summer Flower Top […]
[…] Get Pattern […]
[…] are all my granny square fans? This is the perfect summer top for you to […]